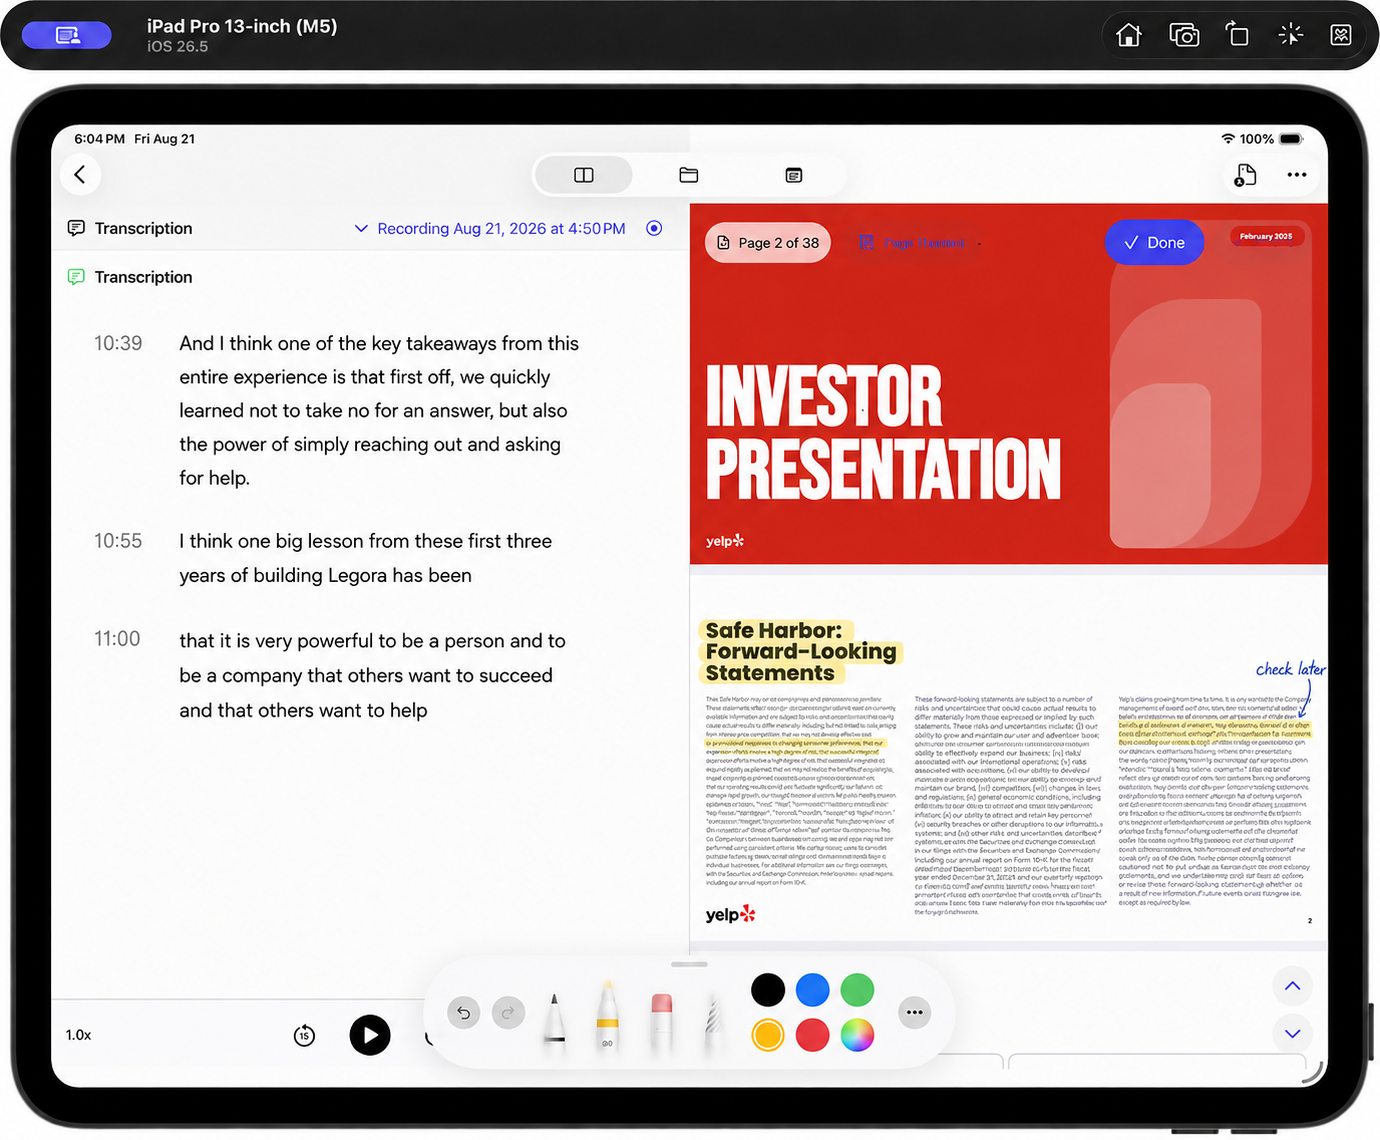
On iPad, Clearly can keep the lecture transcript and your course PDF visible at the same time: the transcript stays on the left, while the PDF and handwriting tools stay on the right. You can follow what the lecturer is saying, underline a slide with Apple Pencil, and add your own explanation without constantly switching apps.
What the iPad study workspace includes
- Live transcript on the left. Start a recording inside the workspace and watch the transcript update while the lecture continues.
- PDF on the right. Keep lecture slides, a reading, or a worksheet open beside the transcript.
- Handwritten PDF annotation. Tap Annotate PDF to write, highlight, or mark up the document with Apple Pencil or touch.
- Saved-recording review. After class, switch the left pane from the live view to an earlier recording and review its transcript beside the PDF.
- Page-linked notes. Add a typed note from the PDF controls and return to notes associated with that document.
Before class: import the PDF
The right pane works with a PDF already stored in the Clearly project. Open the project's Sources section and import the lecture slides or reading as a PDF. Return to Study; Clearly selects an available PDF automatically, and a document selector appears when the project contains more than one.
During class: transcript left, handwriting right
For the clearest working area, use the iPad full-screen or with enough width for the two-pane Study view. Start the recording from the transcript pane. The live transcript remains visible on the left while you scroll through the PDF on the right.
Tap Annotate PDF to enter handwriting mode and open the drawing tools. Mark definitions, circle a diagram, or write the lecturer's explanation directly next to the relevant slide. Tap Done when you want to return to normal PDF selection and navigation.
Your imported PDF stays intact
Clearly saves handwriting as separate markup associated with the document rather than rewriting the imported PDF file. Your annotations are restored when you reopen the PDF, while the original source document remains unchanged.
How to use live transcription and PDF handwriting together
- Open a project in Clearly 1.23 or later on iPad.
- In Sources, import the lecture slides, reading, or worksheet as a PDF.
- Open the project's Study workspace. The transcript pane appears on the left and the PDF pane on the right.
- Start a new recording from the left pane to begin live transcription without leaving the PDF.
- On the right, tap Annotate PDF and use Apple Pencil or touch to write and highlight directly over the document.
- Tap Done after annotating. Clearly saves the markup so it returns with the PDF next time.
- After class, select the saved recording in the left pane to review its transcript while revisiting your handwritten PDF notes.
A practical note-taking workflow
- Let the live transcript capture what was said; do not copy every sentence by hand.
- Use handwriting for the information that is not obvious from the slide: the lecturer's emphasis, a connection, a question, or an exam hint.
- Add a page note when you need a longer typed explanation that would clutter the PDF.
- After class, review the transcript and PDF together while the context is still fresh.
Best on iPad: the two-pane workspace depends on having enough horizontal room. If iPad multitasking makes the app too narrow, expand Clearly or use landscape orientation so both panes remain comfortable to read and write in.

Get Clearly free on the App Store
Live transcription, real-time translation in 75+ languages, AI summaries and an AI tutor — on iPhone & iPad.